
EXCEL ESSENTIALS I: Tips and Tricks for Increased Efficiency
- Cascade
- Jul 31, 2023
- 4 min read

Updated: Aug 2, 2023
I spend around 5 hours daily on MS Excel and SQL, as those are the major tools I use in my role at Access Bank, and I couldn't be happier as I don't have to spend half of my productive works day in needless meetings. It was shocking to discover that the average time workers spend in online meetings per week jumped from 14.2 hours to 21.5 hours over the past two years.
I get to do what I love for most of my productive hours, and I am always looking for ways to enjoy working more and doing tasks at increased speed and efficiency. To help you become more efficient in Excel, boost your productivity and save you valuable time I've compiled a list of useful tips and tricks that I use regularly.

1. Keyboard Shortcuts
I remember when I started my tech journey, I dabbled in programming for a bit, and I did a Python course where the instructor opined that experienced programmers tend to rely heavily on keyboard shortcuts. Till date, I still use my trusty keyboard shortcuts for most tasks. It's just fast, accurate, time saving, and muscle memory has really taken over my workflow. I will be sharing some of my most frequently used shortcuts and what they do.
Instead of relying on the mouse for every action, try using these shortcuts:
Ctrl + Z: Undo the last action.
Ctrl + Y: Redo the last action (after using Ctrl + Z).
Ctrl + A: Select all cells in the current worksheet.
Ctrl + F: Open the "Find" dialog box to search for specific content.
Ctrl + H: Open the "Replace" dialog box to find and replace content.
Ctrl + Arrow Keys: Move to the edge of data region in the current direction.
Ctrl + Shift + Arrow Keys: Select data range quickly.
Ctrl + Home: Go to the top-left cell (A1) of the worksheet.
Ctrl + Shift + L: Apply or remove the filter from the selected table or range.
Ctrl + Shift + : to insert the current time.
Ctrl + ; to insert the current date.
Ctrl + -: Delete the selected cells or rows.
Ctrl + +: Insert cells or rows.
Ctrl + Alt + V: Paste Special
Ctrl + T: Create Table
ALT + F4: Lock a reference.
Alt + Enter: Start a new line within a cell.
Ctrl + 1: Open the Format Cells dialog box.
Ctrl + Shift + ~: Apply the General number format to the selected cells.
Ctrl + Shift + $: Apply the Currency number format to the selected cells.
Ctrl + Shift + %: Apply the Percentage number format to the selected cells.
Ctrl + Shift + #: Apply the Date format to the selected cells.
Take some time to explore and practice using them, and you'll be amazed at how much time you can save.
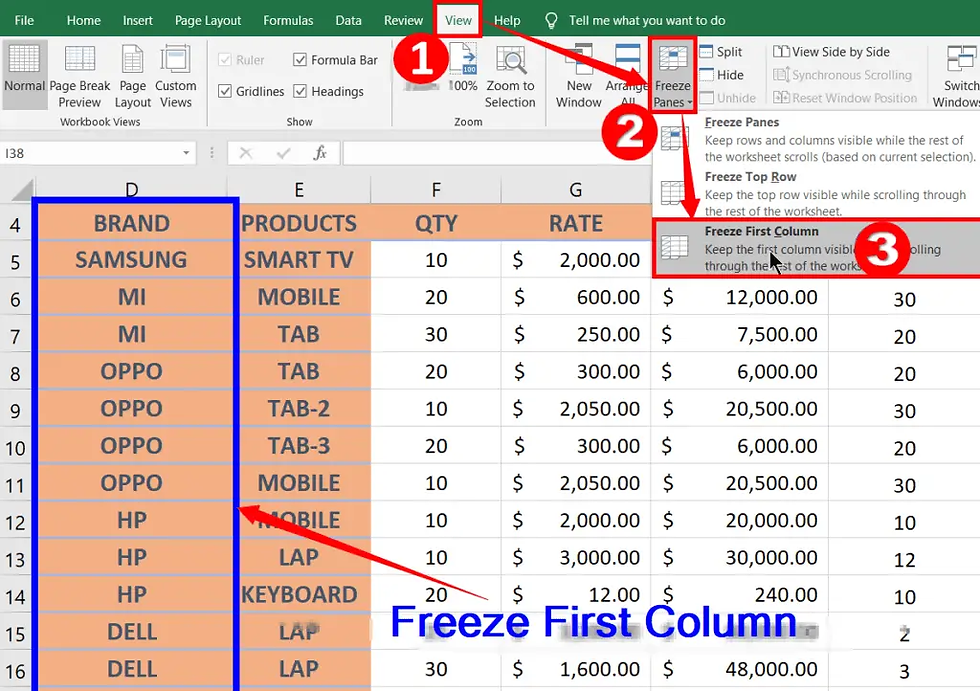
2. Freeze Panes
I am regularly working with large datasets with multiple columns, and it can get very tough to navigate without losing sight of important information. I use Freeze Pane to keep headers or specific rows/columns visible while scrolling.
To freeze panes:
Select the cell below the row or to the right of the column you want to freeze.
Go to the "View" tab and click on "Freeze Panes."
Choose either "Freeze Panes" or "Freeze Top Row" / "Freeze First Column."
3. Filter and Sort
Use the Filter and Sort options to quickly find and organize data. This feature is handy when dealing with extensive datasets.
Filter: The Filter feature allows you to quickly analyze and view specific subsets of data within a larger dataset. It helps you focus on specific criteria and hide the rest of the data temporarily. To apply a filter, select the range of cells you want to filter, go to the "Data" tab, and click on "Filter." Dropdown arrows will appear in the header row of each column, allowing you to select the criteria you want to filter by. Alternatively, use the keyboard shortcut, Ctrl + Shift + L.
Sort: The Sort feature allows you to arrange your data in a specific order, such as alphabetical, numerical, or chronological. To sort your data, select the range of cells you want to sort, go to the "Data" tab, and click on "Sort." Choose the column you want to sort by from the dropdown list, select the sort order, and click "OK" to apply the sort.
4. Named Ranges
Named Ranges make it easier to work with large datasets and formulas. To create a named range:
Select the range of cells you want to name.
Go to the "Formulas" tab and click on "Define Name."
Enter a name for the range and click "OK."
Alternatively, you can use the name box:
Select the range for which you want to create a name (do not select headers).
Go to the Name Box on the left of Formula bar and type the name of the range and press Enter.

We can also use named ranges for individual cells. So instead of =ROUND($I$1/($I$3-1),2), we can have a more readable formula in =ROUND(PROFIT_PER_TRADE/(MULTIPLIER-1),2).
5. Tables and Structured References
Tables are a powerful feature in Excel that allow you to organize and analyze your data more effectively. When you convert a range of data into a table, Excel provides several benefits, including:
Automatic Formatting: Tables come with built-in formatting options that make your data more visually appealing.
Filtering and Sorting: Tables have filter dropdowns in the header row, making it easy to filter and sort your data.
Structured References: Tables use structured references instead of cell references, which makes formulas easier to read and understand. For example, instead of using "A1:A10" to refer to a column, you can use "Random_Nos" if the column is named "Random_Nos" in the table.
To create a table, select the range of cells you want to convert and go to the "Insert" tab. Click on "Table" and choose the desired table style. Alternatively, you can use Ctrl + T.

Remember, the more you use Excel and experiment with its features, the more proficient you'll become. So, don't be afraid to dive in and explore.
Thank you so much.
Thanks for the Excel-ing tips!
This is helpful.👍 Great work 👏